Página sobre o processo de instalação do MicroPython numa placa ESP32-PICO-KIT assim como o uso do Visual Studio Code para edição do código.
Nota: Cada um dos seguintes passos deve ser efetuado tal como é explicado caso contrário será comprometida a realização dos passos seguintes.
Porque alguns dos ficheiros indicados nesta explicação podem sofrer evoluções futuras, disponibilizarei as versões aqui usadas na seguinte pasta partilhada.
Python + Node + VSCode
Começar por instalar o Python 3.8 (neste caso usei o Windows x86-64 executable installer para a versão 3.8.1: python-3.8.1-amd64.exe). Segui a sugestão da instalação ser realizada na pasta: C:\Users\<user>\AppData\Local\Programs\Python\Python38 e ativei a opção de “Add Python 3.8 to PATH”.
Instalar depois o NodeJS (6.9.5 ou superior) no meu caso instalei o Windows Installer (.msi): node-v12.15.0-x64.msi. Segui a sugestão da instalação ser realizada na pasta: C:\Program Files\nodejs\, e não instalei as “Tools for Native Modules”.
Por fim, instalei o Visual Studio Code, mais concretamente o VSCodeUserSetup-x64-1.42.0.exe. A instalação foi feita em C:\Users\<user>\AppData\Local\Programs\Microsoft VS Code e segui a sugestão de “Add to Path (requires shell restart)”. No final não executar ainda o VSCode!
Abrindo uma nova janela de comando (cmd) é possível verificar que todos os programas foram instalados e as respetivas versões:
C:\Users\Helio>python -V
Python 3.8.1

C:\Users\Helio>node -v
v12.15.0

C:\Users\Helio>code -v
1.42.0
ae08d5460b5a45169385ff3fd44208f431992451
x64
Nota: Se algum dos comandos não for reconhecido é porque muito provavelmente não ativou as opção “Add to PATH” referidas anteriormente ou não está a usar uma NOVA janela de comando (cmd).
Segue-se a instalação da ferramenta esptool para programação do firmware do ESP32. Para tal, executar o seguinte comando numa janela de comando cmd:
C:\Users\Helio>pip install esptool
Collecting esptool
Collecting ecdsa (from esptool)
  Using cached https://files.pythonhosted.org/packages/b8/11/4b4d30e4746584684c758d8f1ddc1fa5ab1470b6bf70bce4d9b235965e99/ecdsa-0.15-py2.py3-none-any.whl
Collecting pyaes (from esptool)
Collecting pyserial>=3.0 (from esptool)
  Using cached https://files.pythonhosted.org/packages/0d/e4/2a744dd9e3be04a0c0907414e2a01a7c88bb3915cbe3c8cc06e209f59c30/pyserial-3.4-py2.py3-none-any.whl
Collecting six>=1.9.0 (from ecdsa->esptool)
  Using cached https://files.pythonhosted.org/packages/65/eb/1f97cb97bfc2390a276969c6fae16075da282f5058082d4cb10c6c5c1dba/six-1.14.0-py2.py3-none-any.whl
Installing collected packages: six, ecdsa, pyaes, pyserial, esptool
Successfully installed ecdsa-0.15 esptool-2.8 pyaes-1.6.1 pyserial-3.4 six-1.14.0
WARNING: You are using pip version 19.2.3, however version 20.0.2 is available.
You should consider upgrading via the 'python -m pip install --upgrade pip' command.
A verificação de que o esptool ficou bem instalado pode ser feita correndo o comando:
C:\Users\Helio>esptool.py
esptool.py v2.8
usage: esptool [-h] [--chip {auto,esp8266,esp32}] [--port PORT] [--baud BAUD]
               [--before {default_reset,no_reset,no_reset_no_sync}] [--after {hard_reset,soft_reset,no_reset}]
               [--no-stub] [--trace] [--override-vddsdio [{1.8V,1.9V,OFF}]]
               {load_ram,dump_mem,read_mem,write_mem,write_flash,run,image_info,make_image,elf2image,read_mac,chip_id,flash_id,read_flash_status,write_flash_status,read_flash,verify_flash,erase_flash,erase_region,version}
               ...

esptool.py v2.8 - ESP8266 ROM Bootloader Utility

positional arguments:
  {load_ram,dump_mem,read_mem,write_mem,write_flash,run,image_info,make_image,elf2image,read_mac,chip_id,flash_id,read_flash_status,write_flash_status,read_flash,verify_flash,erase_flash,erase_region,version}
                        Run esptool {command} -h for additional help
    load_ram            Download an image to RAM and execute
    dump_mem            Dump arbitrary memory to disk
    read_mem            Read arbitrary memory location
    write_mem           Read-modify-write to arbitrary memory location
    write_flash         Write a binary blob to flash
    run                 Run application code in flash
    image_info          Dump headers from an application image
    make_image          Create an application image from binary files
    elf2image           Create an application image from ELF file
    read_mac            Read MAC address from OTP ROM
    chip_id             Read Chip ID from OTP ROM
    flash_id            Read SPI flash manufacturer and device ID
    read_flash_status   Read SPI flash status register
    write_flash_status  Write SPI flash status register
    read_flash          Read SPI flash content
    verify_flash        Verify a binary blob against flash
    erase_flash         Perform Chip Erase on SPI flash
    erase_region        Erase a region of the flash
    version             Print esptool version

optional arguments:
  -h, --help            show this help message and exit
  --chip {auto,esp8266,esp32}, -c {auto,esp8266,esp32}
                        Target chip type
  --port PORT, -p PORT  Serial port device
  --baud BAUD, -b BAUD  Serial port baud rate used when flashing/reading
  --before {default_reset,no_reset,no_reset_no_sync}
                        What to do before connecting to the chip
  --after {hard_reset,soft_reset,no_reset}, -a {hard_reset,soft_reset,no_reset}
                        What to do after esptool.py is finished
  --no-stub             Disable launching the flasher stub, only talk to ROM bootloader. Some features will not be
                        available.
  --trace, -t           Enable trace-level output of esptool.py interactions.
  --override-vddsdio [{1.8V,1.9V,OFF}]
                        Override ESP32 VDDSDIO internal voltage regulator (use with care)
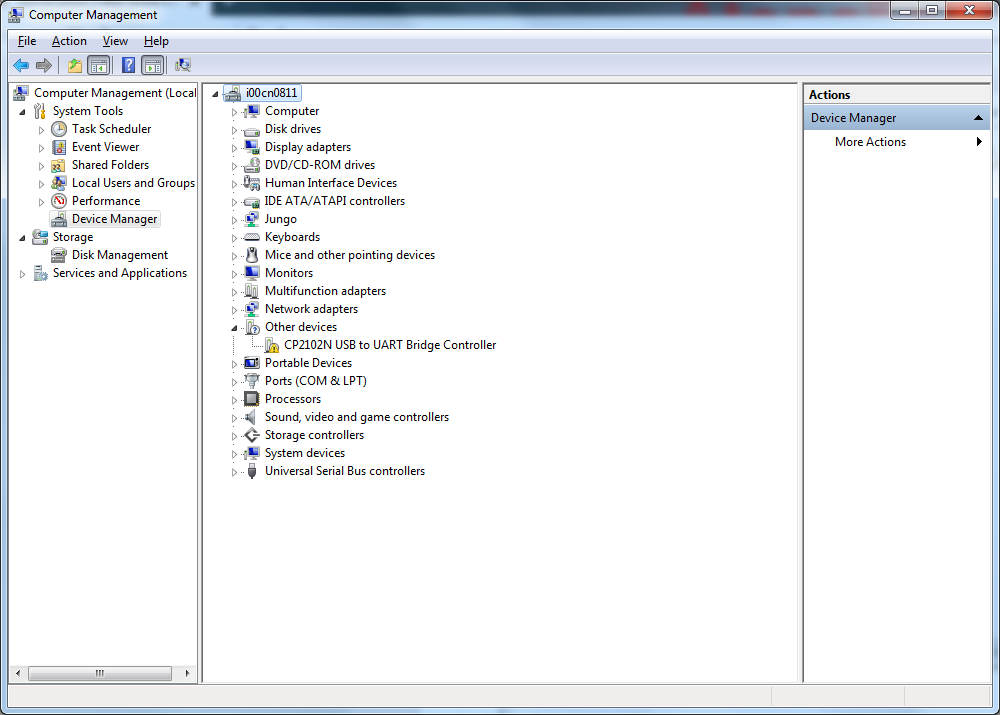
Começar por ligar a placa ESP32-PICO-KIT ao computador por cabo USB e ver no “Gestor de Dispositivos” qual a porta COM atribuída.
Caso a placa não surja como uma porta virtual COMx (ver figura) instale os respetivos drivers.
No caso do Windows 10 eles vêm no CP210x_Universal_Windows_Driver.zip bastando executar o programa CP210xVCPInstaller_x64.exe no caso da versão de 64 bits).
Começa-se por limpar a memória de programa (flash) do ESP32, usando a porta COM adequada (nestes exemplos será a COM6):
C:\Users\Helio>esptool.py --chip esp32 --port COM6 erase_flash
esptool.py v2.8
Serial port COM6
Connecting........__
Chip is ESP32-PICO-D4 (revision 1)
Features: WiFi, BT, Dual Core, 240MHz, Embedded Flash, VRef calibration in efuse, Coding Scheme None
Crystal is 40MHz
MAC: d8:a0:1d:6a:0b:1c
Uploading stub...
Running stub...
Stub running...
Erasing flash (this may take a while)...
Chip erase completed successfully in 4.5s
Hard resetting via RTS pin...
Segue-se a instalação do firmware MicroPython esp32-idf4-20191220-v1.12.bin no ESP32 executando o seguinte comando:
C:\Users\Helio>esptool.py --chip esp32 --port COM6 --baud 460800 write_flash -z 0x1000 Downloads\esp32-idf4-20191220-v1.12.bin
esptool.py v2.8
Serial port COM6
Connecting....
Chip is ESP32-PICO-D4 (revision 1)
Features: WiFi, BT, Dual Core, 240MHz, Embedded Flash, VRef calibration in efuse, Coding Scheme None
Crystal is 40MHz
MAC: d8:a0:1d:6a:0b:1c
Uploading stub...
Running stub...
Stub running...
Changing baud rate to 460800
Changed.
Configuring flash size...
Auto-detected Flash size: 4MB
Compressed 1408512 bytes to 894711...
Wrote 1408512 bytes (894711 compressed) at 0x00001000 in 20.5 seconds (effective 550.4 kbit/s)...
Hash of data verified.

Leaving...
Hard resetting via RTS pin...
micropy-cli
Segue-se este processo de integração do micropy-cli (GitHub) no VSCode, há que fazer o seguinte numa janela de commando:
C:\Users\Helio>pip install --upgrade micropy-cli
Collecting micropy-cli
  Using cached micropy_cli-3.3.0-py3-none-any.whl (127 kB)
Processing c:\users\helio\appdata\local\pip\cache\wheels\12\d2\88\6e706d3b6874a2948967d0838eb0e0224a8a43b4eb273cf3f3\requirements_parser-0.2.0-py3-none-any.whl
Collecting requests<3.0,>=2.22
  Using cached requests-2.23.0-py2.py3-none-any.whl (58 kB)
Collecting tqdm<5.0,>=4.39
  Using cached tqdm-4.43.0-py2.py3-none-any.whl (59 kB)
Collecting Jinja2<3.0,>=2.10
  Using cached Jinja2-2.11.1-py2.py3-none-any.whl (126 kB)
Collecting click<8.0,>=7.0
  Using cached Click-7.0-py2.py3-none-any.whl (81 kB)
Collecting cachier<2.0,>=1.2
  Using cached cachier-1.4.1-py2.py3-none-any.whl (13 kB)
Processing c:\users\helio\appdata\local\pip\cache\wheels\62\70\49\400c325d1db02901ad862338304643ea65e8a68c84e36d9125\dpath-1.5.0-py3-none-any.whl
Collecting questionary<2.0,>=1.4
  Using cached questionary-1.5.1-py3-none-any.whl (25 kB)
Collecting boltons<20.0,>=19.3
  Using cached boltons-19.3.0-py2.py3-none-any.whl (166 kB)
Collecting jsonschema==3.2.0
  Using cached jsonschema-3.2.0-py2.py3-none-any.whl (56 kB)
Collecting packaging<20.0,>=19.2
  Using cached packaging-19.2-py2.py3-none-any.whl (30 kB)
Collecting colorama<0.5.0,>=0.4.3; sys_platform == "win32"
  Using cached colorama-0.4.3-py2.py3-none-any.whl (15 kB)
Collecting chardet<4,>=3.0.2
  Using cached chardet-3.0.4-py2.py3-none-any.whl (133 kB)
Collecting idna<3,>=2.5
  Using cached idna-2.9-py2.py3-none-any.whl (58 kB)
Collecting urllib3!=1.25.0,!=1.25.1,<1.26,>=1.21.1
  Using cached urllib3-1.25.8-py2.py3-none-any.whl (125 kB)
Collecting certifi>=2017.4.17
  Using cached certifi-2019.11.28-py2.py3-none-any.whl (156 kB)
Collecting MarkupSafe>=0.23
  Downloading MarkupSafe-1.1.1-cp38-cp38-win_amd64.whl (16 kB)
Processing c:\users\helio\appdata\local\pip\cache\wheels\4c\8e\7e\72fbc243e1aeecae64a96875432e70d4e92f3d2d18123be004\pathtools-0.1.2-py3-none-any.whl
Processing c:\users\helio\appdata\local\pip\cache\wheels\4e\14\01\1676612f5b23c641868de61d36ac2d5be12f4eec6c087fbd62\watchdog-0.10.2-py3-none-any.whl
Collecting portalocker
  Using cached portalocker-1.5.2-py2.py3-none-any.whl (14 kB)
Collecting prompt-toolkit<4.0,>=2.0
  Using cached prompt_toolkit-3.0.3-py3-none-any.whl (348 kB)
Requirement already satisfied, skipping upgrade: six>=1.11.0 in c:\users\helio\appdata\local\programs\python\python38\lib\site-packages (from jsonschema==3.2.0->micropy-cli) (1.14.0)
Collecting attrs>=17.4.0
  Using cached attrs-19.3.0-py2.py3-none-any.whl (39 kB)
Requirement already satisfied, skipping upgrade: setuptools in c:\users\helio\appdata\local\programs\python\python38\lib\site-packages (from jsonschema==3.2.0->micropy-cli) (41.2.0)
Collecting pyrsistent>=0.14.0
  Using cached pyrsistent-0.15.7.tar.gz (107 kB)
Collecting pyparsing>=2.0.2
  Using cached pyparsing-2.4.6-py2.py3-none-any.whl (67 kB)
Collecting pywin32!=226; platform_system == "Windows"
  Downloading pywin32-227-cp38-cp38-win_amd64.whl (9.1 MB)
     |████████████████████████████████| 9.1 MB 3.3 MB/s
Collecting wcwidth
  Using cached wcwidth-0.1.8-py2.py3-none-any.whl (17 kB)
Installing collected packages: requirements-parser, chardet, idna, urllib3, certifi, requests, tqdm, MarkupSafe, Jinja2, click, pathtools, watchdog, pywin32, portalocker, cachier, dpath, wcwidth, prompt-toolkit, questionary, boltons, attrs, pyrsistent, jsonschema, pyparsing, packaging, colorama, micropy-cli
    Running setup.py install for pyrsistent ... done
Successfully installed Jinja2-2.11.1 MarkupSafe-1.1.1 attrs-19.3.0 boltons-19.3.0 cachier-1.4.1 certifi-2019.11.28 chardet-3.0.4 click-7.0 colorama-0.4.3 dpath-1.5.0 idna-2.9 jsonschema-3.2.0 micropy-cli-3.3.0 packaging-19.2 pathtools-0.1.2 portalocker-1.5.2 prompt-toolkit-3.0.3 pyparsing-2.4.6 pyrsistent-0.15.7 pywin32-227 questionary-1.5.1 requests-2.23.0 requirements-parser-0.2.0 tqdm-4.43.0 urllib3-1.25.8 watchdog-0.10.2 wcwidth-0.1.8
Em seguida procurar os “stubs” para placas ESP32:
C:\Users\Helio>micropy stubs search esp32

MicroPy  Searching Stub Repositories...

MicroPy  Results for esp32:
MicroPy  esp32-micropython-1.10.0
MicroPy  esp32-micropython-1.11.0
MicroPy  esp32-micropython-1.12.0
MicroPy  esp32-micropython-1.9.4
MicroPy  esp32-pycopy-1.11.0
MicroPy  esp32-pycopy-2.11.0.1
MicroPy  esp32-pycopy-2.11.0.5
MicroPy  esp32-pycopy-3.0.0
MicroPy  esp32_LoBo
MicroPy  esp32_LoBo-esp32_LoBo-3.2.24
Neste caso interessa a esp32-micropython-1.12.0 pelo que a instalamos de seguida:
C:\Users\Helio>micropy stubs add esp32-micropython-1.12.0

MicroPy  Adding esp32-micropython-1.12.0 to stubs

MicroPy  Resolving stub...
MicroPy  esp32-micropython-1.12.0: 100%|█████████████████████████████████████████████████████████| [9.83k/9.83k @ ?B/s]
MicroPy  Detected Firmware: micropython
MicroPy  Firmware not found locally, attempting to install it...

MicroPy  Resolving stub...
MicroPy  micropython: 100%|██████████████████████████████████████████████████████████████████| [43.4k/43.4k @ 44.6MB/s]
MicroPy  <img draggable="false" data-mce-resize="false" data-mce-placeholder="1" data-wp-emoji="1" class="emoji" alt="✔" src="https://s.w.org/images/core/emoji/11/svg/2714.svg"> micropython firmware added!
MicroPy  <img draggable="false" data-mce-resize="false" data-mce-placeholder="1" data-wp-emoji="1" class="emoji" alt="✔" src="https://s.w.org/images/core/emoji/11/svg/2714.svg"> esp32-micropython-1.12.0 added!
Segue-se a instalação da extensão Pymakr no VSCode, algo que também pode ser feito da linha de comando, assim:
C:\Users\Helio>code --install-extension pycom.pymakr
Installing extensions...
Installing extension 'pycom.pymakr' v1.1.5...
Extension 'pycom.pymakr' v1.1.5 was successfully installed.
Segue-se a instalação da extensão Python no VSCode, algo que também pode ser feito da linha de comando, assim:
C:\Users\Helio>code --install-extension ms-python.python
Installing extensions...
Installing extension 'ms-python.python' v2020.2.64397...
Extension 'ms-python.python' v2020.2.64397 was successfully installed.
VSCode
No VSCode deveremos abrir o ficheiro de configurações global Pymakr (pymakr.json) indo ao rodapé e escolhendo “All Commands” e depois Pymakr > Global setting, e alterá-lo com a seguinte informação:
"address": "COM6",
...
"open_on_start": false,
...
"auto_connect": false,
Após o que gravamos as alterações através do menu File > Save ou com o atalho Ctrl+S.
Criar projeto
Na pasta do workspace executar numa janela de comando (por exemplo no VSCode terminal):
Microsoft Windows [Version 10.0.18362.657]
(c) 2019 Microsoft Corporation. Todos os direitos reservados.

D:\workspace>micropy init test
Caso em vez da shell cmd abrir antes a Powershell, carregar na combobox com esse nome e selecionar “Select Default Shell”, escolhendo-se de seguida a shell cmd.
Podemos começar por selecionar todos os templates (algo que pode ser feito através da tecla i seguindo de enter:
MicroPy  Creating New Project
? Choose any Templates to Generate  (Use arrow keys to move, <space> to select, <a> to toggle, <i> to invert)
 » ○ VSCode Settings for Autocompletion/Intellisense
   ○ Pymakr Configuration
   ○ Pylint MicroPython Settings
   ○ Git Ignore Template
   ○ main.py & boot.py files
Escolhe-se depois o “stub” (neste caso o esp32-micropython-1.12.0) carregando em space seguido de enter:
MicroPy  Creating New Project
? Choose any Templates to Generate  done (5 selections)
? Which stubs would you like to use?  (Use arrow keys to move, <space> to select, <a> to toggle, <i> to invert)
 » ○ esp32-micropython-1.12.0
No final é criada a pasta test:
MicroPy  Initiating test
MicroPy  Stubs: esp32-micropython-1.12.0

MicroPy  Rendering Templates
MicroPy  Populating Stub Info...
MicroPy  Vscode File Generated!
MicroPy  Pylint File Generated!
MicroPy  Vsextensions File Generated!
MicroPy  Pymakr File Generated!
MicroPy  Main File Generated!
MicroPy  Boot File Generated!
MicroPy  Gitignore File Generated!
MicroPy  ✔ Stubs Injected!
MicroPy  ✔ Project Created!

MicroPy  Created test at ./test
Esta pasta pode ser agora aberta no VSCode (File > Open Folder…). Aí é preciso editar o ficheiro pymakr.conf, onde devemos editar a porta COM para o valor adequado, por exemplo:
"address": "COM6",
Após o que gravamos as alterações (File > Save ou Ctrl+S).
Assim que o VSCode deteta a presença de ficheiros .py recomenda a instalação de certas extensões (This workspace has extension recomendations) pelo que deveremos carregar no botão “Show Recommendations” e instalar a “Visual Studio IntelliCode” (processo que pode demorar alguns minutos, podendo ser acompanhado no rodapé do VSCode).
Carregando no botão de Reset da placa ESP32-PICO-KIT (o mais perto da antena WiFi) é possível ver o arranque do MicroPython:
>>> ets Jun  8 2016 00:22:57

rst:0x1 (POWERON_RESET),boot:0x13 (SPI_FAST_FLASH_BOOT)
configsip: 188777542, SPIWP:0xee
clk_drv:0x00,q_drv:0x00,d_drv:0x00,cs0_drv:0x00,hd_drv:0x00,wp_drv:0x00
mode:DIO, clock div:2
load:0x3fff0018,len:4
load:0x3fff001c,len:4988
load:0x40078000,len:10404
load:0x40080400,len:5680
entry 0x400806bc
I (520) cpu_start: Pro cpu up.
I (520) cpu_start: Application information:
I (520) cpu_start: Compile time:     Dec 20 2019 07:56:38
I (523) cpu_start: ELF file SHA256:  0000000000000000...
I (529) cpu_start: ESP-IDF:          v4.0-beta1
I (534) cpu_start: Starting app cpu, entry point is 0x40083014
I (0) cpu_start: App cpu up.
I (545) heap_init: Initializing. RAM available for dynamic allocation:
I (552) heap_init: At 3FFAFF10 len 000000F0 (0 KiB): DRAM
I (558) heap_init: At 3FFB6388 len 00001C78 (7 KiB): DRAM
I (564) heap_init: At 3FFB9A20 len 00004108 (16 KiB): DRAM
I (570) heap_init: At 3FFBDB5C len 00000004 (0 KiB): DRAM
I (576) heap_init: At 3FFCC8A0 len 00013760 (77 KiB): DRAM
I (582) heap_init: At 3FFE0440 len 00003AE0 (14 KiB): D/IRAM
I (589) heap_init: At 3FFE4350 len 0001BCB0 (111 KiB): D/IRAM
I (595) heap_init: At 40099FB8 len 00006048 (24 KiB): IRAM
I (601) cpu_start: Pro cpu start user code
I (620) spi_flash: detected chip: generic
I (620) spi_flash: flash io: dio
I (620) cpu_start: Chip Revision: 1
W (622) cpu_start: Chip revision is higher than the one configured in menuconfig. Suggest to upgrade it.
I (633) cpu_start: Starting scheduler on PRO CPU.
I (0) cpu_start: Starting scheduler on APP CPU.
MicroPython v1.12 on 2019-12-20; ESP32 module with ESP32
Type "help()" for more information.
>>>
É agora possível ver a linha de REPL do MicroPython onde podemos executar o tradicional “Hello World”:
Connecting to COM6...

>>> print("Hello World")
Hello World
>>>
Como sugerido podemos executar a função help():
>>> help()
Welcome to MicroPython on the ESP32!

For generic online docs please visit http://docs.micropython.org/

For access to the hardware use the 'machine' module:

import machine
pin12 = machine.Pin(12, machine.Pin.OUT)
pin12.value(1)
pin13 = machine.Pin(13, machine.Pin.IN, machine.Pin.PULL_UP)
print(pin13.value())
i2c = machine.I2C(scl=machine.Pin(21), sda=machine.Pin(22))
i2c.scan()
i2c.writeto(addr, b'1234')
i2c.readfrom(addr, 4)

Basic WiFi configuration:

import network
sta_if = network.WLAN(network.STA_IF); sta_if.active(True)
sta_if.scan()                             # Scan for available access points
sta_if.connect("<AP_name>", "<password>") # Connect to an AP
sta_if.isconnected()                      # Check for successful connection

Control commands:
  CTRL-A        -- on a blank line, enter raw REPL mode
  CTRL-B        -- on a blank line, enter normal REPL mode
  CTRL-C        -- interrupt a running program
  CTRL-D        -- on a blank line, do a soft reset of the board
  CTRL-E        -- on a blank line, enter paste mode

For further help on a specific object, type help(obj)
For a list of available modules, type help('modules')
Abrindo a pasta src do projeto é possível ver os ficheiros boot.py e main.py.
Editando o main.py com o seguinte código:
from time import sleep
from machine import Pin

led = Pin(21, Pin.OUT)

while True:
  led.value(not led.value())
  sleep(.5)
Depois de gravado (Ctrl+S) podemos fazer o Upload das alterações (no rodapé do VSCode) após o que a placa reinicia correndo o programa que faz piscar um LED ligado no pino 21.
A execução do programa pode ser interrompida carregando em Ctrl+C.
Caso se pretenda voltar a correr esse script, escolher agora a opção Run.
Erros
Caso apareça o erro:
Linter pylint is not installed.
Source: Python (Extension) Install; Select Linter; Do not show again
Escolher Install e ir a File > Preferences > Settings > Search Settings: Pylint Path, e alterar a configuração: Python › Linting: Pylint Path de pylint para C:\Users\<user>\AppData\Roaming\Python\Python38\Scripts\pylint.exe
Caso apareçam avisos the “bad-indentation” é possível ignorá-los editando o ficheiro .pylintrc:
disable = bad-indentation, missing-docstring, line-too-long, …